
SphereMail now offers the option to connect your USPS Business Customer Gateway (BCG) account so you can automate the process of sending your customers information to the USPS Customer Registration Database (CRD).
Before connecting the integration and sending information, you'll first need to enable it, verify your assigned email address, and complete the USPS registration process.
IMPORTANT NOTE: always review your customers' information before submitting it to the CRD.
Even if your customers completed their notarization through SphereMail, we strongly recommend reviewing their information before submitting it to the CRD. While the information may already be available in our system, it's important to make sure all details are accurate, consistent, and correctly associated with the relevant customer and Form 1583. This helps prevent incorrect or mismatched information from being submitted and allows you to identify any forms that may need corrections or a new notary session before proceeding.
TABLE OF CONTENTS
- How to enable the integration
- How to activate and verify your email address
- Complete the email verification
- Complete your USPS registration
- How to connect your USPS account to SphereMail
- How to send customers' information to the CRD
- Understanding CRD submission statuses
- How to update your USPS login credentials
1. How to enable the integration
Go to your settings
Go to your settings
Navigate to "Integrations".
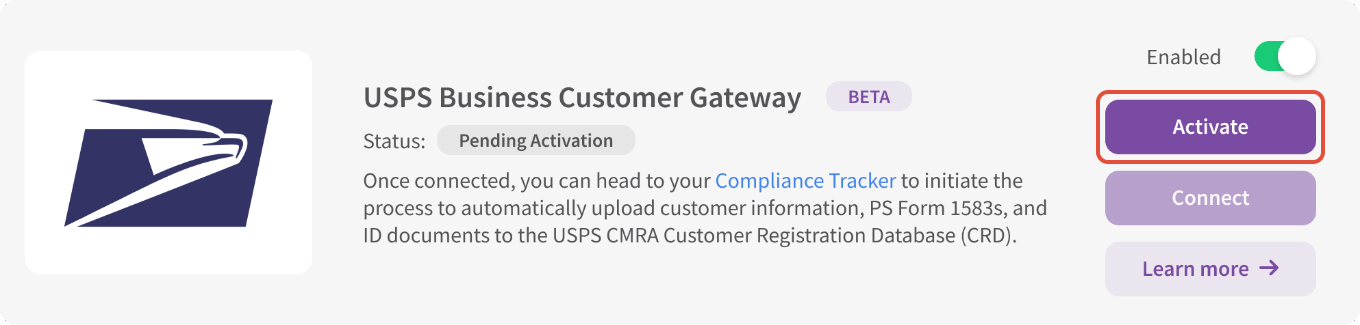
Locate "USPS Business Customer Gateway (BCG)" and enable the integration toggle.
 Once enabled, the integration will display a "Pending Activation" status.
2. How to activate and verify your email address
Before connecting your USPS BCG account, you'll need to activate the integration and confirm an email address where you can receive important USPS notifications.
Why can't you use a preexisting BCG account?
For security reasons, SphereMail creates a dedicated email address for your USPS BCG integration rather than connecting to your preexisting account. This keeps the new account and its associated credentials isolated and exclusively used for this integration. It also allows you to manage access independently by updating the dedicated USPS account or removing its access to your CMRA location whenever needed.
However, you won’t need to log into this dedicated email inbox, we'll establish a forwarding rule that automatically forwards incoming messages to the business email address you confirm during activation. This ensures you can receive important emails from USPS, including the verification emails required when registering your new Business Customer Gateway account.
- Click on the "Activate" button
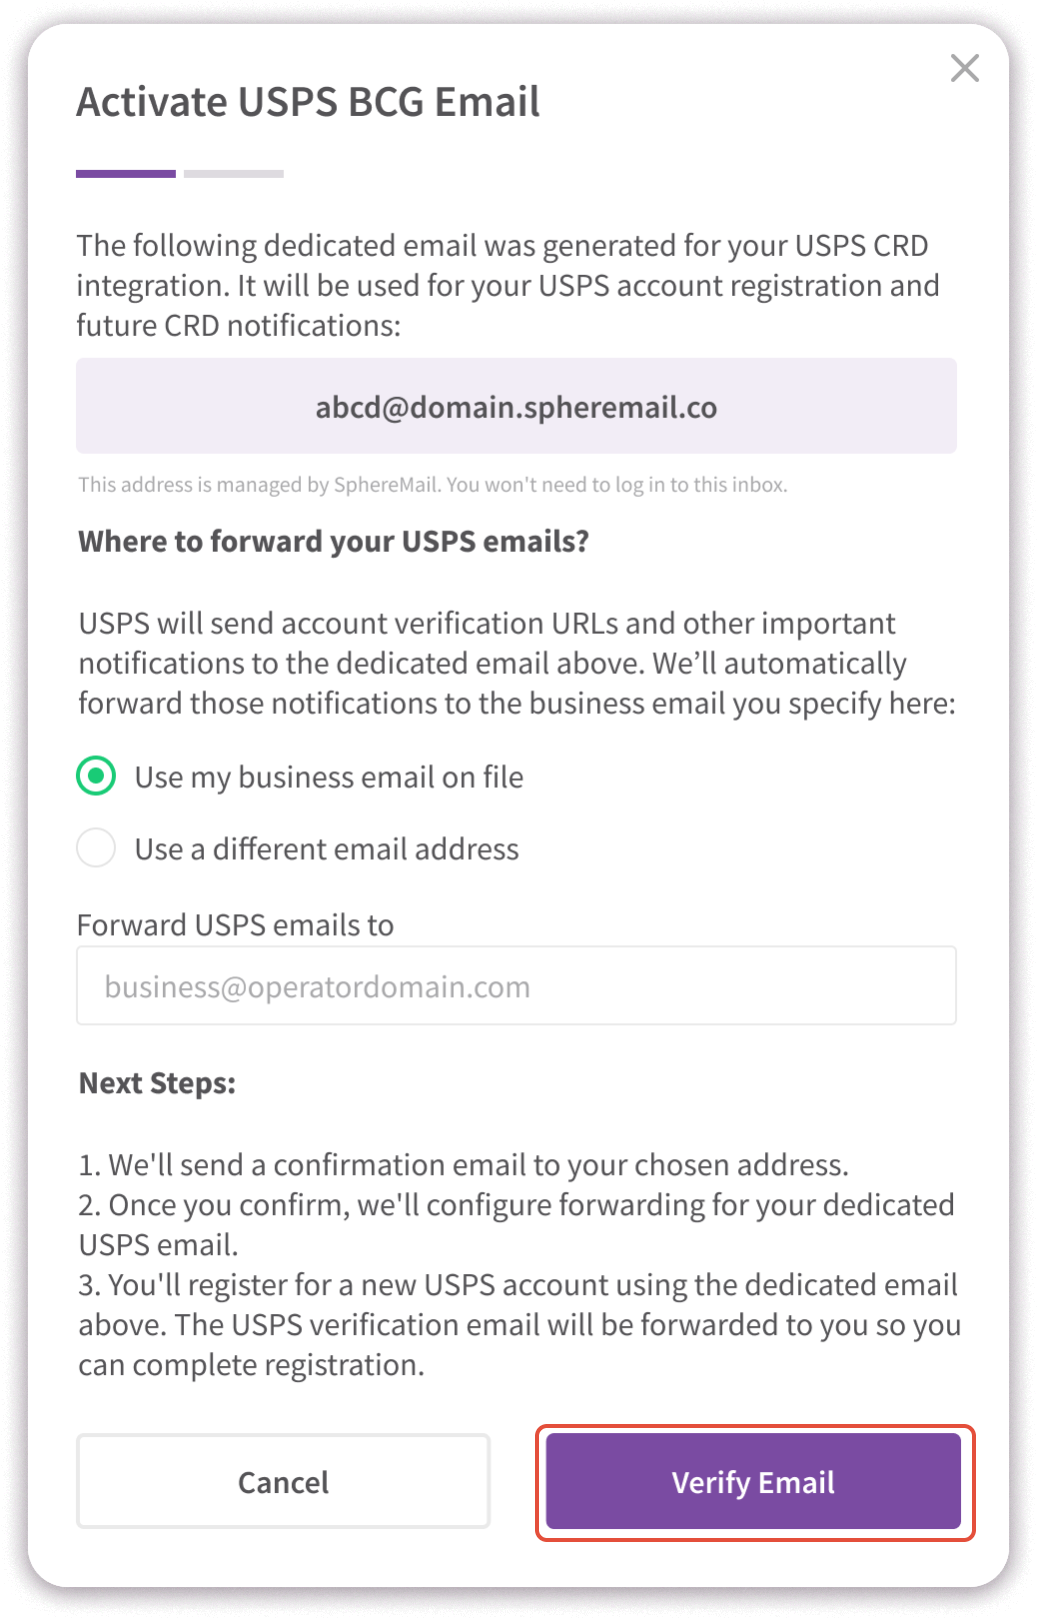
- You'll be prompted to choose which email address you'd like to use for receiving forwarded emails:
- Use your current business email: confirm your existing business email address.
- Use a different email: select this option if you'd prefer to receive forwarded emails at another address.
- Once you've confirmed your preferred email address, click "Verify Email" to initiate the verification process.
3. Complete the email verification
After requesting verification, you'll see a confirmation screen explaining your next steps. And SphereMail will send a verification email to the business email address you've confirmed.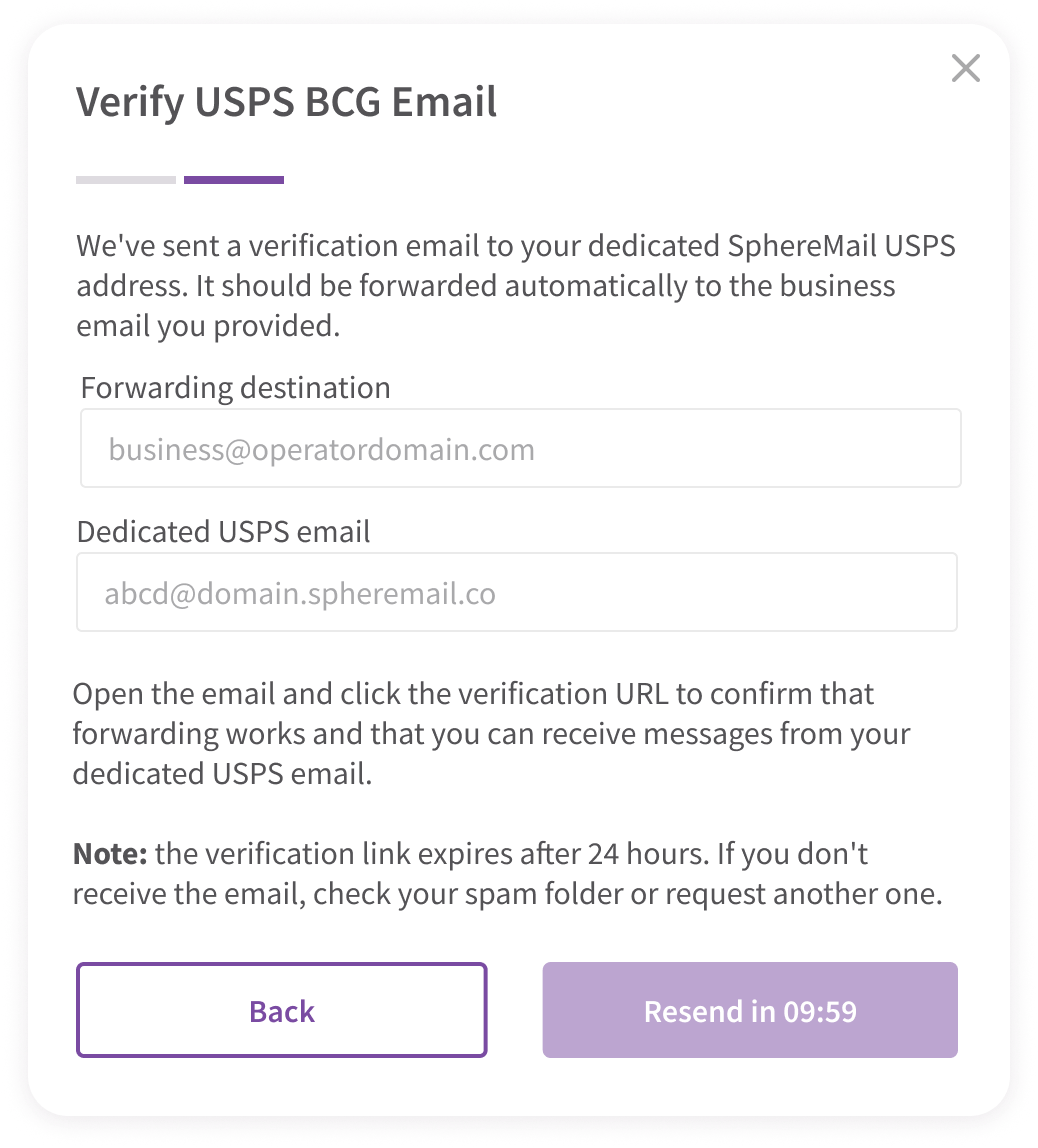
Check your inbox for the verification email.
If you can't find the email, make sure to check your spam or junk folder before requesting a new one.Open the email, read the steps carefully, and click the verification link.
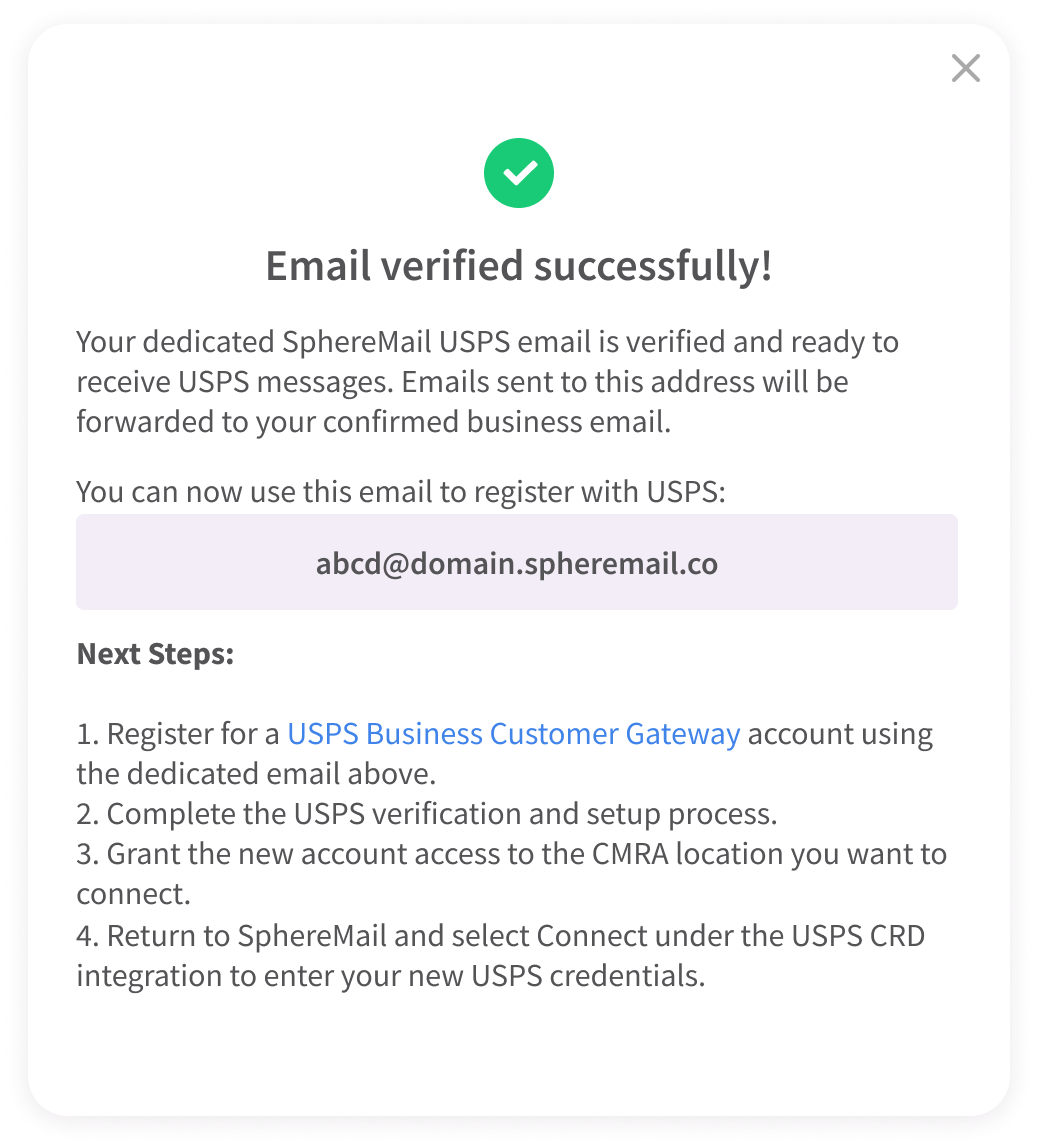
You'll be redirected to your SphereMail account to authenticate you, then you'll see a confirmation popup indicating whether the verification was successful.
- If verification is successful: you're ready to proceed to the next step.
- If verification fails: please repeat the verification steps by clicking the "Verify" button, where you can either resend the verification email, or go back and choose a different email address.
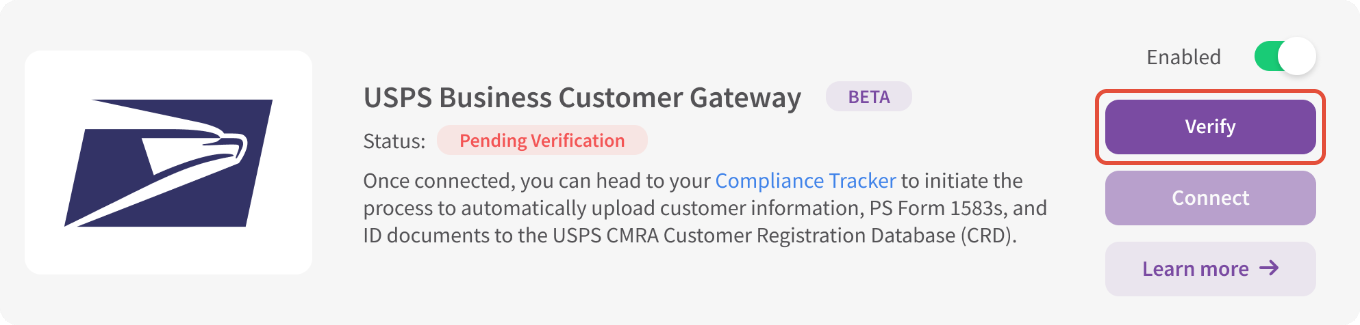
A few things to keep in mind:
The "Resend" option becomes available after a 10-minute waiting period. The countdown displayed indicates when you can request another verification email.
Clicking "Back" will reset the email setup, allowing you to specify a different email address and restart the verification process.
If you close the activation window before completing verification, you can return to the integration card and click "Verify" to resume the process.
Why is the "Connect" button unavailable?
The "Connect" button will only become available once you've completed the activation process and verified your email successfully. This is to ensure your USPS account is associated with the dedicated email address provided by SphereMail.
Once your email address has been successfully verified, the integration status will change to "Pending Connection", and the activation button will display "Activated".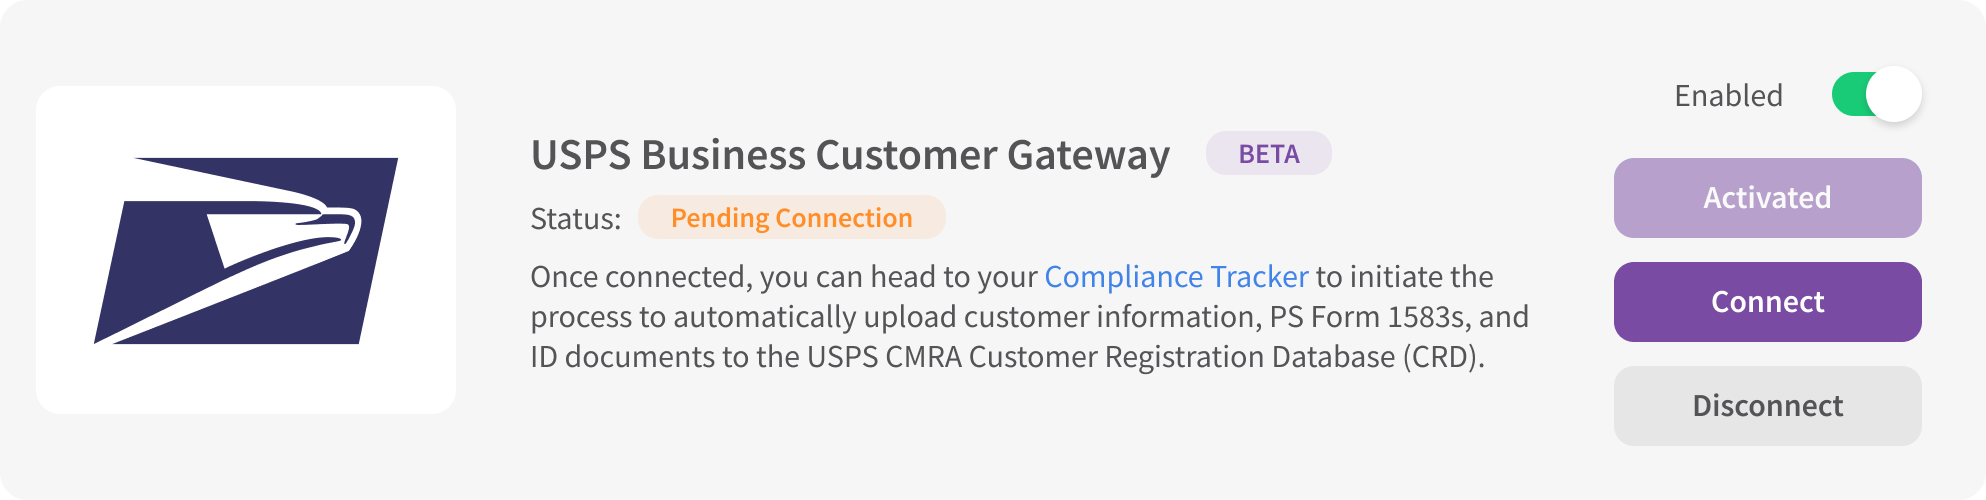
You're now ready to complete your USPS Business Customer Gateway registration.
4. Complete your USPS registration
Head over to the USPS BCG website and follow the registration instructions below, and once your USPS account is ready, return to your SphereMail portal to complete the final step of this connection.
i. Create a new USPS Business Customer Gateway account
- Open the USPS Business Customer Gateway.
- Click "Sign up for the BCG".
- Enter the dedicated email address provided by SphereMail to start the USPS verification process.
- USPS will email a validation link, which will be delivered to your email inbox, as confirmed in steps 2 and 3.
- Follow the USPS instructions to finalize your registration:
- Verify your business details
- Provide your contact information
- Create a unique username.
- Set a password and security questions.
IMPORTANT NOTE: Make sure you use the dedicated email address provided by SphereMail, rather than an existing USPS account or email address, otherwise, the integration will not work.
ii. Enable access to the CMRA 1583 dashboard
Creating a BCG account does not automatically grant access to your CMRA records. The new account must also be given access to the CMRA service and the specific location you want to connect to your SphereMail account.
- Sign in to your new USPS BCG account.
- Navigate to "Mailing Services".
Find "Commercial Mail Receiving Agency (CMRA)" and click "Go to Service".
If your account already has access to the CMRA service, the CMRA dashboard should open.
iii. Make sure your new account has access to the correct CMRA location
There are two ways to obtain access, depending on your existing permissions:
Option A: ask an existing CMRA administrator to grant access
If your location is already registered with USPS and has a CMRA administrator:
- Ask the administrator to sign in to their USPS BCG account.
- Navigate to the CMRA dashboard and open "Manage Users".
- Select "Add User".
- Choose the CMRA location you want to connect.
- Enter the new account's BCG username (Login ID).
- Click "Verify Account".
- Once the account is verified, select the appropriate access level and save your changes.
Option B: request administrator access to your CMRA location
If you manage the location and need to claim its administrative access:
- Open "CMRA Location (1583-A)" in the CMRA dashboard.
- Enter the ZIP code of the CMRA location you're connecting.
- Click "Find".
- Locate the correct business address in the search results.
- Click "Request Admin" next to that location.
- USPS will send an administrator validation code by regular mail to the location.
- Once you receive the code, return to the CMRA dashboard, select the pending location, enter the code, and click "Validate".
IMPORTANT NOTE: USPS indicates the validation code can take up to 10 business days to arrive and is valid for 25 days from the date it was requested.
iv. Confirm your CMRA location access
Before returning to SphereMail, make sure:
You can successfully access the CMRA dashboard using your new BCG account.
The correct CMRA business location is available.
You can access the "1583" section and view the associated customer records for that location.
If you manage multiple CMRA locations, make sure you select the specific location you intend to connect to your SphereMail portal. Your newly created account cannot have access to more than one location. If you need to connect multiple locations, please follow the same steps to register each account with its dedicated email address.
Once you've completed these steps, return to SphereMail and proceed with connecting your USPS credentials.
5. How to connect your USPS account to SphereMail
After completing your USPS registration, you can finally connect your account:
Go back to "Settings" > "Integrations" > "Systems" in your SphereMail portal.
Find the USPS BCG integration card again.
Click "Connect".
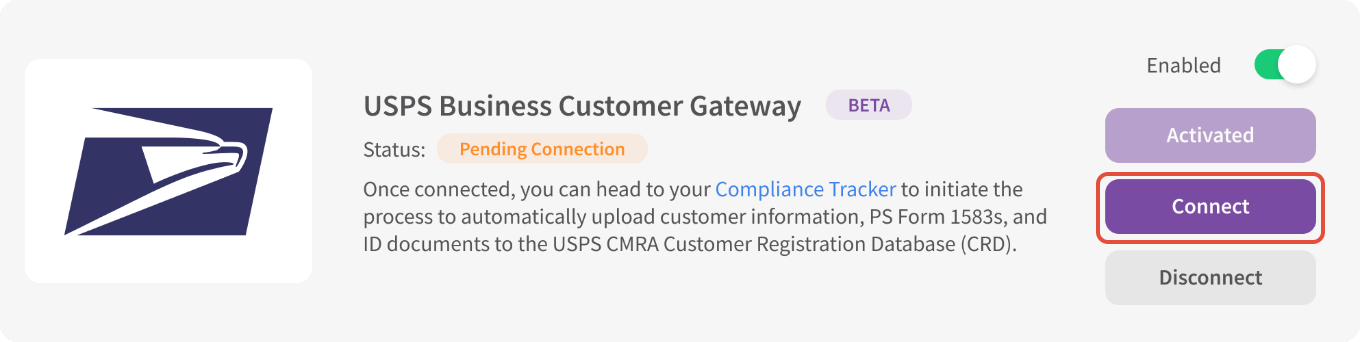
A popup will appear asking you to provide your USPS login credentials.
Review the email address displayed in the popup. This is the email address generated for your integration and is provided for reference only. It cannot be edited at this stage.
Enter the USPS username and password for the account created in step 3.
Click "Connect" to complete the process.
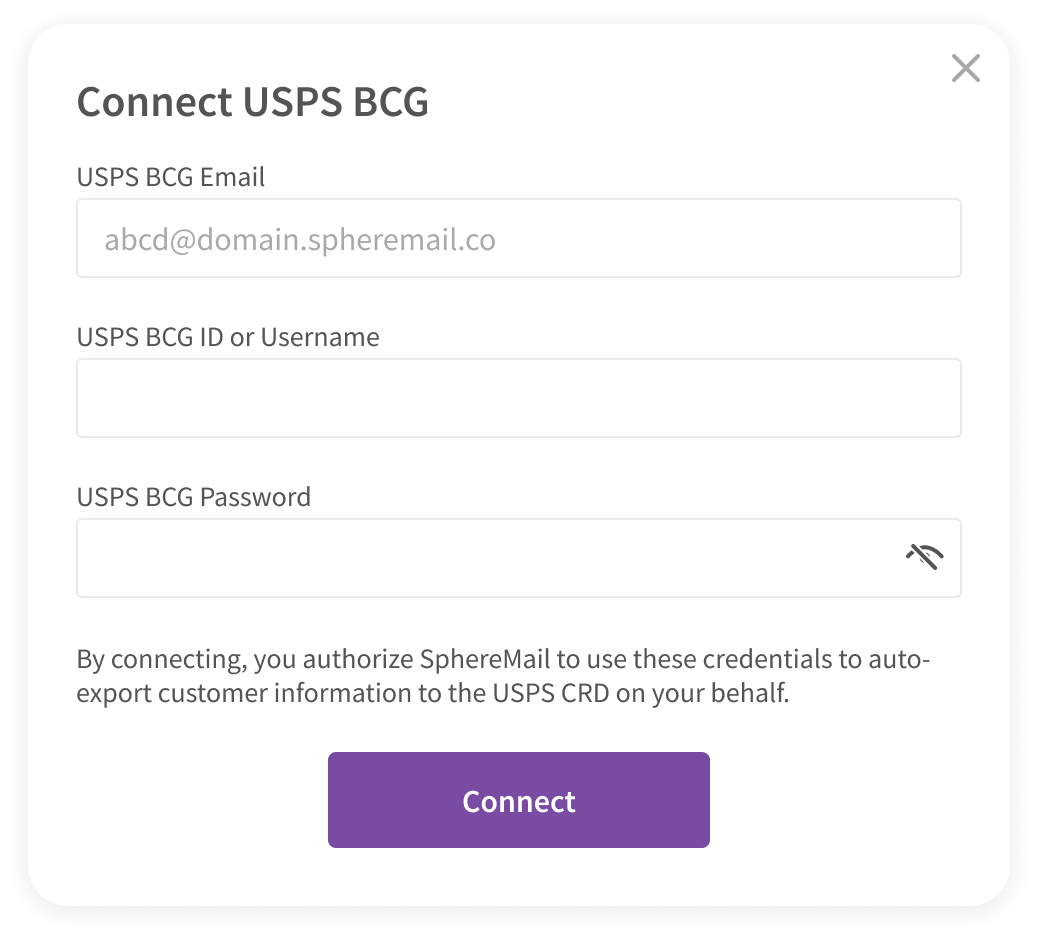
IMPORTANT NOTE: Make sure you're using the USPS credentials associated with the email address displayed in the connection window. If you use any other set of credentials, your integration will not work.
And you're all set!
6. How to send customers' information to the CRD
You can now head to the Compliance Tracker to start sending your customers' information to the USPS CRD.
- Head to your "Reports" page
- Click on "Customers" to go to your Compliance Tracker
- Select the quarter and year needed
- Select the customers you'd like to submit to the CRD
- Click "Submit Forms"
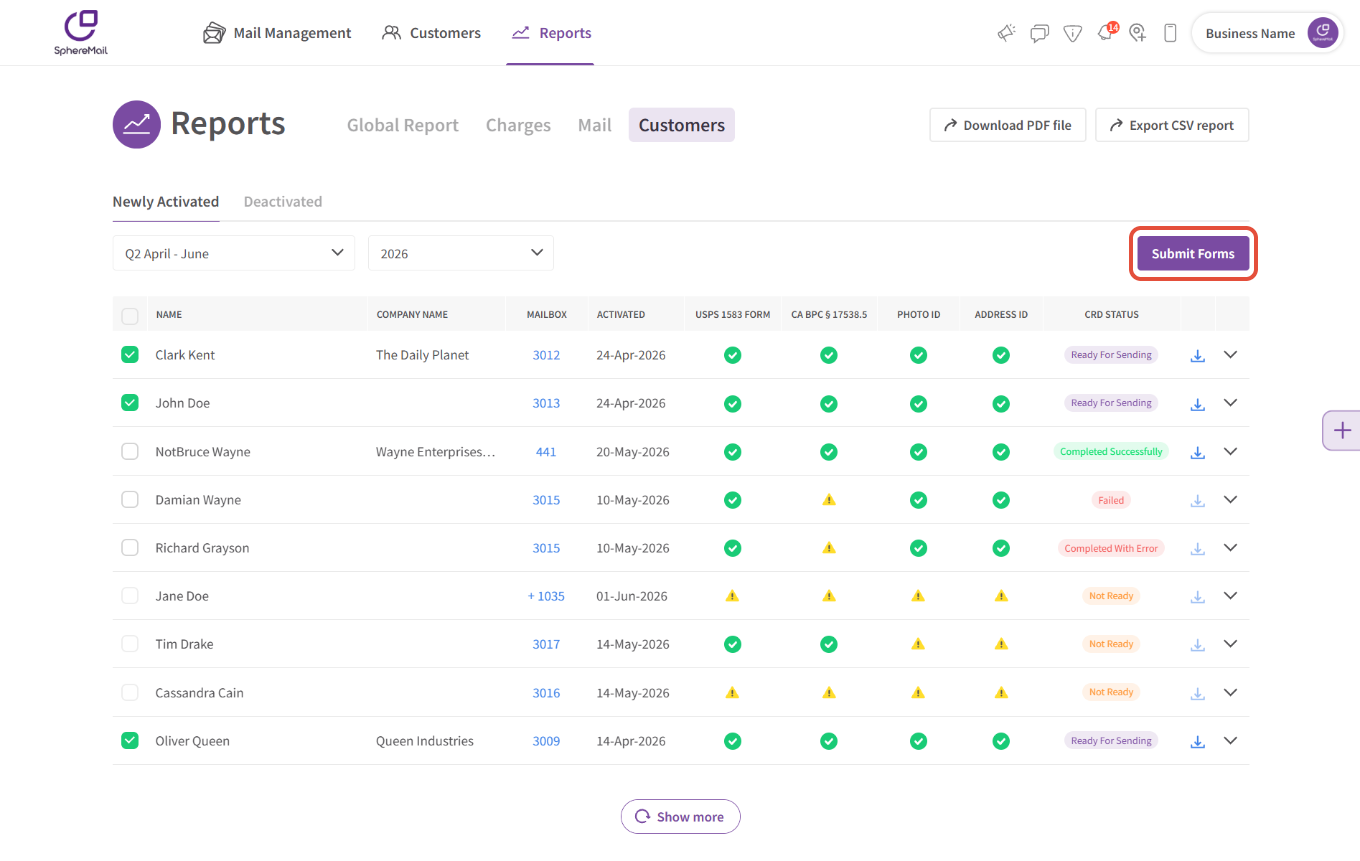
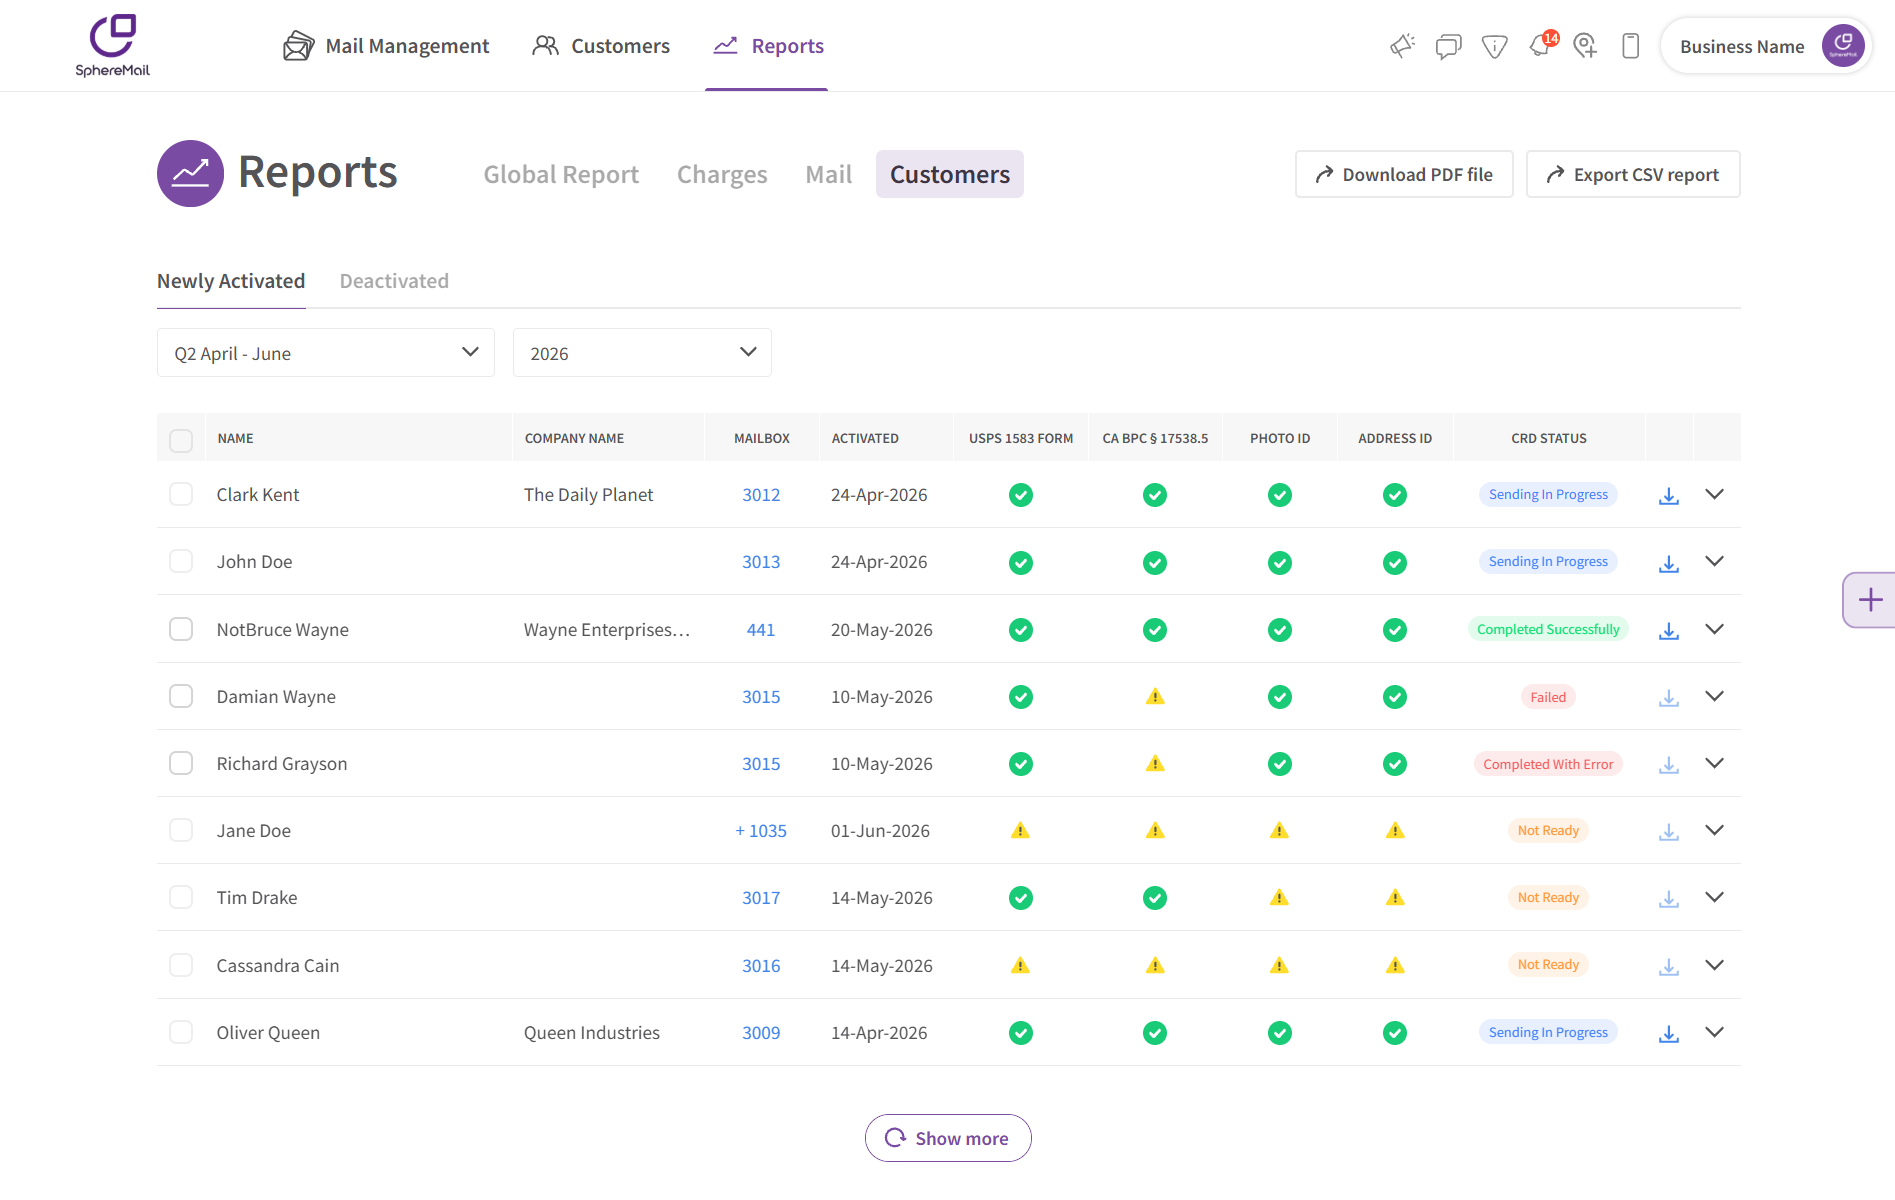
And you're done! The process will automatically run in the background to authenticate with the USPS CRD and create drafts for your customers using the information provided during their notarization process. Once the process is finished, your customers' CRD status will update to show whether they were submitted successfully, or if anything failed that might require correction from your customer before you can resubmit it, or if you'll need to manually update/enter this data on their CRD 1583 draft.
IMPORTANT NOTE: If your customers completed their notarization outside of SphereMail and simply uploaded their notarized or completed Forms 1583 to the portal, we won't have the form information stored in our system to automatically populate or submit their data to the CRD. In these cases, you'll need to retrieve the required information manually from the uploaded documents and enter it yourself. SphereMail does not automatically extract (OCR) or independently verify information from manually uploaded forms, so checking the documents and ensuring the information is entered correctly is your responsibility.
7. Understanding CRD submission statuses
When viewing your Compliance Tracker under "Reports" > "Customers" while the integration is connected, you'll see a CRD Status next to each customer. This status helps you track whether their information is ready to be submitted, currently being processed, or has already been successfully sent to the USPS CMRA Registration Database (CRD).
Here's what each status means and whether any action is required:
| Status | What it means | What you need to do |
|---|---|---|
| Not Ready | The customer is still missing one or more required documents, forms, or information needed for submission. | Review the customer's record and complete any missing requirements before attempting to submit their information. |
| Ready For Sending | All required information and documents are available, and the customer's record is ready for submission. | Select the customer and click "Submit Forms" to send their information to the CRD. |
| Sending In Progress | The customer's information and documents are currently being processed and sent to the CRD in the background. | No action is required. Please wait for the process to finish before attempting another submission. |
| Failed | The submission process encountered an error and could not be completed. | Hover over the status to view the error message and identify what went wrong. Follow the indicated instructions or contact us if further assistance is needed. |
| Completed With Error | The submission was partially successful, but some information or documents could not be sent to the CRD. | Review the error details and identify what failed. Depending on the issue, the information may need to be corrected on the SphereMail side before retrying, or manually updated/submitted to the CRD. |
| Completed Successfully | The submission was successful. The customer's draft record was created in the CRD, and their associated forms were uploaded successfully. | No further action is required for this submission. |
A few important things to remember:
Only customers with a "Ready For Sending" status can be selected for submission.
Customers marked as "Not Ready" must have their missing information or documentation completed before they can be submitted.
A "Sending In Progress" status means the submission is still being processed. Allow it to finish before taking further action.
If a submission is marked as "Failed" or "Completed With Error", always review the associated error message before deciding how to proceed.
A "Completed Successfully" status confirms that the customer's draft record and associated forms were successfully submitted to the CRD, you can verify and review this record on the CRD before submitting the draft to USPS.
8. How to update your USPS login credentials
If you ever change your USPS username or password, you don't need to go through the entire activation process again. Simply:
Go to "Settings" > "Integrations" > "Systems".
Find the USPS BCG integration card.
Click "Update".
Provide your new USPS login credentials and confirm your changes to keep the integration connected.
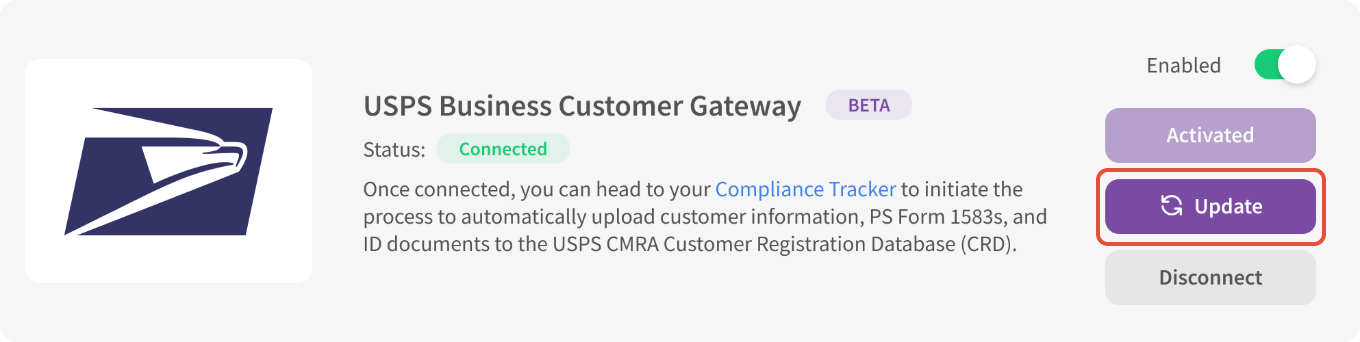
Once updated, your integration will resume its connection using your new credentials.